How to Setup W3 Total Cache WordPress Plugin

As I consider that W3 Total Cache is the great plugin for cache, but to get more from W3 Total Cache plugin you have to Configure appropriately, so we’re going to share this tutorial with our readers on How to Setup W3 Total Cache WordPress Plugin.
How to Configure W3 total cache WordPress Plugin
These are some advanced settings options, so read carefully one wrong step can create a big problem related to your blog or website.Follow exacts steps we are sharing with you to avoid the mistakes.
Step 1.How to Install W3 total cache
The first step is how to install W3 Total Cache plugin on your WordPress website.If you’re a old blogger on WordPress then we hope you already know How to Install W3 total cache, but if you don’t know then you can directly install W3 total cache plugin from your WordPress Dashboard.
1.Open your WP dashboard.
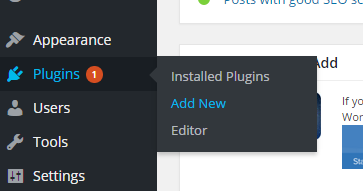
2.Click on the Plugin option in the Left side menu panel.
3.Now click on the Add New button.
4.Enter the name of Plugin “W3 Total Cache”.
5.After the search result appear, click on the install button to install W3 Total Cache plugin and then activate the plugin.
Users can also install this plugin manually without searching the plugin.
You just have to download the W3 Total cache plugin from here.After downloading you have to upload this plugin on your server “plugin folder” which you’ll get here youdomain.com/wp_content/plugins after logged in your server.
Important Note: If you have already had installed other cache plugin like W3 super cache, then delete the previous one or do not install W3 total cache.It is hardly recommended that do not use 2 cache plugin at once unless it will create problems.
Step 2.Configuring General settings of W3 Total Cache
The second step is configuring general settings of W3 total cache.General settings can be found by following this path Performance >> General Settings.General settings has it’s own module and you can see the screenshots of these modules if some things wrong with your general settings.
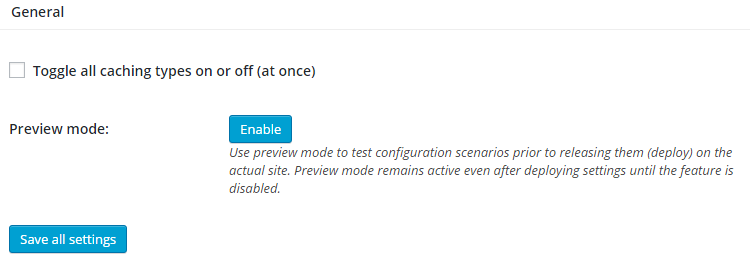
1st Module: General
It’s not important to enable the general module because it is possible that some of the options which enable by General module may not support your hosting provider which affect your site speed and make your site loading slower.So ignore this setting and skip to the next module.
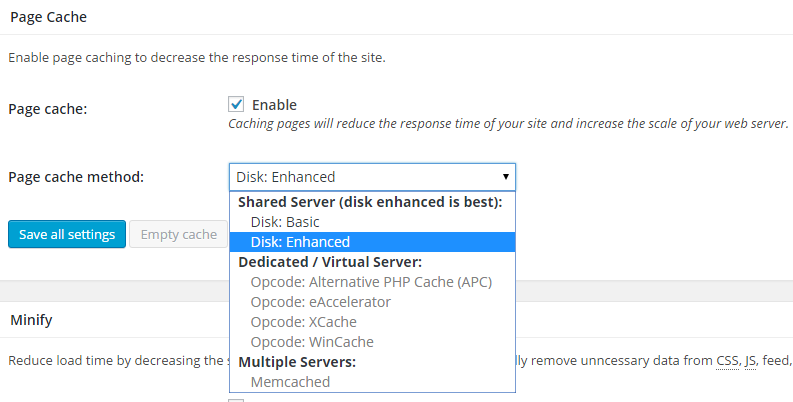
2nd Module: Page Cache
The second module is page cache.It has two options which depends upon your hosting type for example, if your website is running on shared hosting then you have to select the disk: Enhanced option, but if your website in running on VPN or dedicated hosting then select the remaining option which is categorised according to the server type.
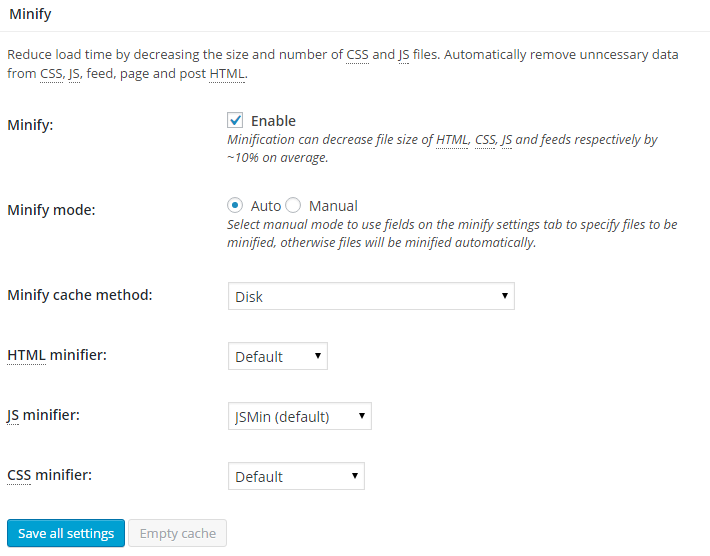
3rd Module: Minify
The third and one of the important module is minify.The minify module reduces load time by decreasing the size and number of CSS and JS files. Automatically remove unncessary data from CSS, JS, feed, page and post HTML like comments and whitespaces.
Minify module also depends on your hosting type, if your website is running on shared hosting then select Minify cache method “Disk” from the drop down menu and if your website is running on dedicated or VPN hosting then you should select the respective option.
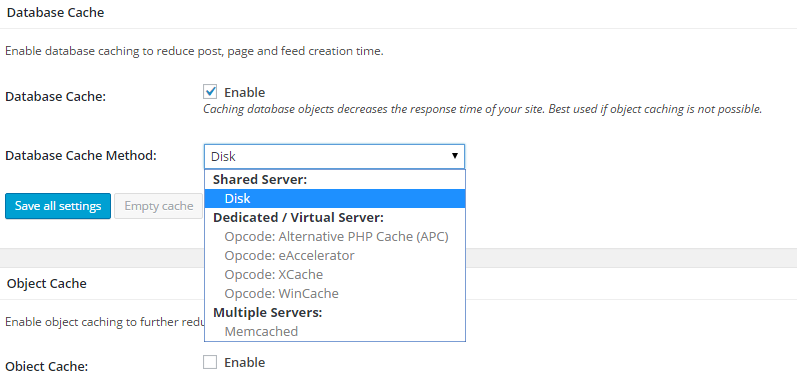
4th Module: DataBase Cache
The fourth module is Database cache and its enable database caching to reduce post, page and feed creation time.The same method is applying to configure Database module which was used to apply in page caching module and minify caching module.Selecting the DataBase cache method is depend on hosting type.
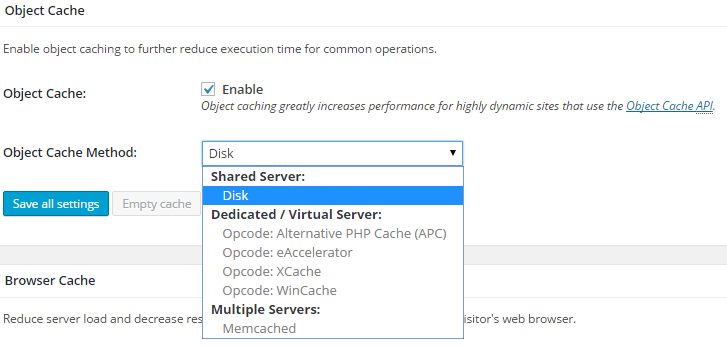
5th Module: Object Cache
The fifth module is Database cache and its enable object caching to further reduce execution time for common operations.The same method is applying to configure Database module which was used to apply in page caching module and minify caching module.Selecting the DataBase cache method is depend on hosting type.
 Step 3.Page Cache Settings
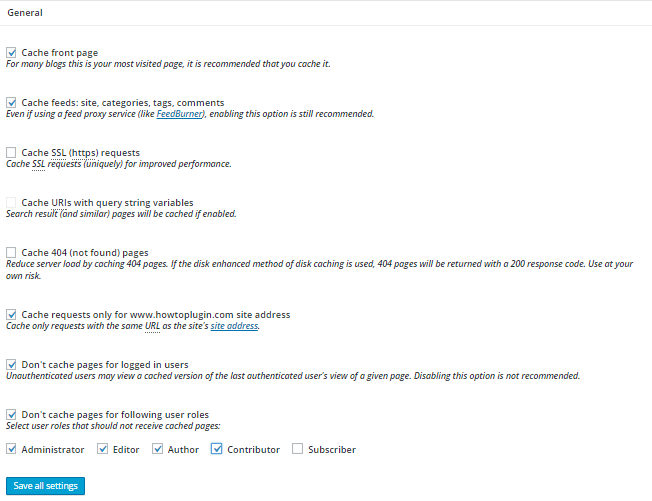
The third and very important step is Page Cache Settings.You can find the Page cache setting in the left menu panel Performance>>Page Cache.This setting is used to enable the front page cache because for some websites front page is the most visited page so it is important to enable the cache for front page.(See the Screenshot)
Step 4.Browser Cache Settings
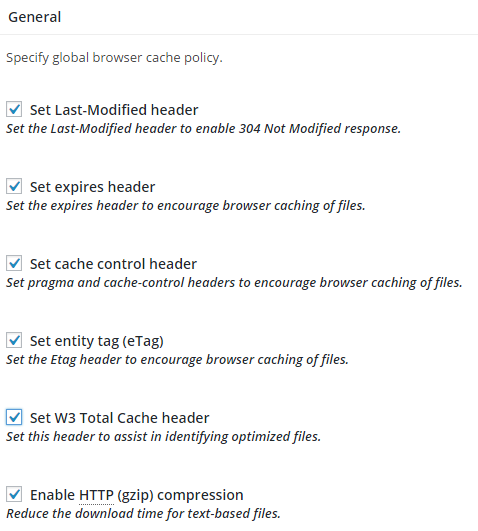
Browser Cache Settings is the 4th and last step to configure the W3 total cache plugin.This setting option is used to serve static file such as CSS, JS and images from the visitors browser.Serving static file from browser increase the page loading speed because static files can be serve from browser.To enable browser cache settings you have to enable the all first 6 options.(See the screenshots)
Check the Changed Performance
After following all these step, your website is surely get optimized with the W3 total cache plugin.Now you just have to see the difference between the performance of the website before installing W3 Total cache plugin and after installing and setting up the W3 total cache plugin.
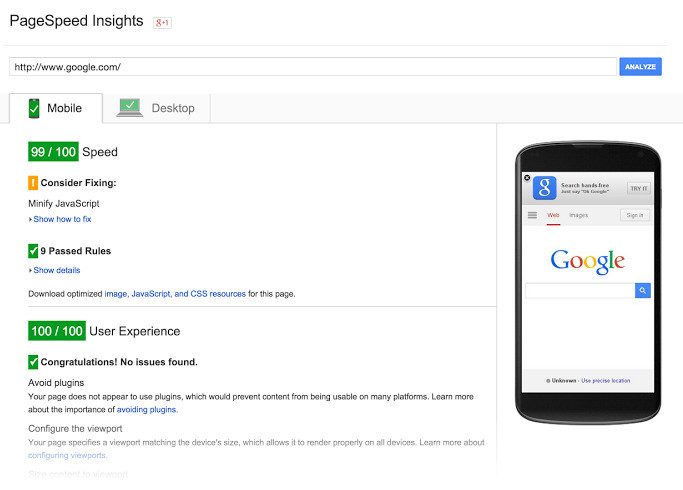
Open any Page loading speed checker website which you can find on the internet or you can open GtMetrix, Pingdom or Google page speed insight tool to check the website speed and its performance.
Final Words
If you’re looking to know that which caching plugin you should use to enable the caching on your WordPress blog then honestly if your website is running on shared hosting then W3 super cache is good and setting up W3 super cache is very easy, you just need to plug and play the w3 super cache.
You just read the tutorial on How to Setup W3 Total Cache WordPress Plugin and If you perfectly understand that how to setup W3 total cache plugin on shared hosting and another type of hosting then you should use W3 total cache on WordPress website.
W3 total cache completely enables the caching on your WordPress blog so that’s why you should choose the W3 total cache, but if you’re still confused than you can choose the best cache plugin for WordPress blog here.


 Step 3.Page Cache Settings
Are You Looking for SEO Services in India? Hi I am Raj, I am not a company but a freelancer.
Are You Looking for Website Designing in India? Hi I am Raj, I am not a company but a freelancer.
Are You Looking for Content Writing in India? Hi I am Gamala, I am not a company but a freelancer.
Tattvaa Yogashala offers the opportunity to journey into the depths of your yoga practice. Located in Rishikesh, the yoga capital of the world, on the banks of the holy Ganges River, our school offers a natural haven for those who seek an experience and environment in which to evolve in body, mind and spirit. We are globally known for world class Yoga Teacher Training in Rishikesh, India.
Yoga Teacher Training in Rishikesh || Hatha Yoga Teacher Training in India
200-hour residential new to ashtanga yoga teacher training course in India with Yoga Alliance USA RYT 200 Certification at Yoga School Tattvaa Yogashala, Rishikesh
Yoga Teacher Training in Rishikesh || Hatha Yoga Teacher Training in India
300-hour residential Ashtanga Vinyasa yoga teacher training courses in India with Yoga Alliance certification at yoga school Tattvaa Yogashala, Rishikesh.
Yoga Teacher Training in Rishikesh || Hatha Yoga Teacher Training in India
500-hour (200 Hour + 300 Hour) residential Ashtanga Vinyasa yoga teacher training courses in India with Yoga Alliance certification at yoga school Tattvaa Yogashala, Rishikesh.
Yoga Teacher Training in Rishikesh || Hatha Yoga Teacher Training in India
Yoga is a type of physical, mental, and spiritual discipline that originated in ancient India. It focuses on breathing techniques, meditation, and posture. Someone who practices yoga typically performs poses with the aim of bringing the mind and body into a state of complete relaxation.
Yoga Teacher Training in India
Vishwa Shanti Yoga School is Rys 200 and Rys 300 conducting affordable intensive residential 200, 300, and 500-hour hatha yoga teacher training international certification courses affiliated with Yoga Alliance USA in Rishikesh, India for beginners, intermediate to advanced level yoga practitioners. The Program includes of few Ashtanga yoga sequences.
yoga teacher training rishikesh | 200 hour yoga teacher training india | 200 hour yoga teacher training rishikesh | 300 hour yoga teacher training india | 300 hour yoga teacher training in rishikesh | 500 hour yoga teacher training in india | 500 hour yoga teacher training in rishikesh | oldest yoga school in rishikesh | yoga school rishikesh | yoga school india | best yoga school in india | best yoga school rishikesh
We offer Yoga teacher training in Rishikesh, designed for beginners to advanced yoga practitioners, with international yoga certifications (RYT 200 & RYT 500) recognized by Yoga Alliance.
Yoga Teacher Training in Rishikesh || 200 Hour Yoga Teacher Training India || 300 Hour Yoga Teacher Training India || 500 Hour Yoga Teacher Training India || 200 Hour Yoga Teacher Training Rishikesh || 300 Hour Yoga Teacher Training Rishikesh || 500 Hour Yoga Teacher Training Rishikesh
Abhayaranya Yoga Ashram, a retreat center in India, offers yoga, meditation and Ayurveda focussed health & wellness programs in Rishikesh in the foothills of the Himalayas.
Yoga Retreats in Rishikesh || 200 Hour Yoga Teacher Training in India || Yoga Teacher Training in India || 300 Hour Yoga Teacher Training in India || 500 Hour Yoga Teacher Training in India
Tour Venture India located in Haridwar of Uttarakhand is travel agent (agency) that offers you all kinds of trip around India be it pilgrimage tour, adventure and nature travel, trekking, water sports, family trip.
Travel Agency in Uttarakhand || Travel Agents in India